Everybody has a different taste. This also holds true when we are customizing our operating system. In this blog, we will learn how you can easily customize Linux Ubuntu by changing the themes, icons, shell, dock, application menu, and many more. You will also learn how to add custom widgets to Ubuntu distribution.
The things taught here are applied and tested on Ubuntu, but this will work the same on any other Linux distribution with the GNOME Tweak Tool.
Let’s Follow the Steps to Customize Linux Distribution Ubuntu.
Customize Linux using GNOME Tweak Tool
Many of you have guessed the first step earlier, as the second paragraph of the blog gives a hint of what tool we are going to use in order to customize our Ubuntu Operating System.
Install GNOME Tweak Tool
The Installation process of the GNOME Tweak tool has been discussed in the previous blog. If you have not installed GNOME Tweak Tool on your Ubuntu or any other Linux Distribution. Click on the Read More Button and follow the blog to install the GNOME Tweak tool Correctly on your machine.
After Installing the GNOME Tweak Tool, Open it either by using terminal command, or directly from the application menu.
Let’s take look at some important sections in the Tweak Tool to customize our Linux Distribution i.e Ubuntu.
Appearance Section
This is the section where we will change our OS Theme, Cursor, Icons, Shell, Sound and Background and Lock Screen.
As we have only installed the GNOME Tweaks tool and not added any kind of theme, only the default themes will be available.
Later on the blog we have a separate section on how to add new themes in Ubuntu.
Extensions Section
This section keeps record of the installed extensions and give let you turn it ON and OFF any time you want.
Top Bar Section
The Top Bar Section allows you to choose what you want to display on the top bar of the Ubuntu. You can also choose what date and time format suits you.
Change Theme in Ubuntu
The default ubuntu themes didn’t catch my attention. So it’s time to download new themes and make it the default theme for our Ubuntu Operating System.
Let’s follow the steps to customize theme in Ubuntu.
Step 1: Download New Theme
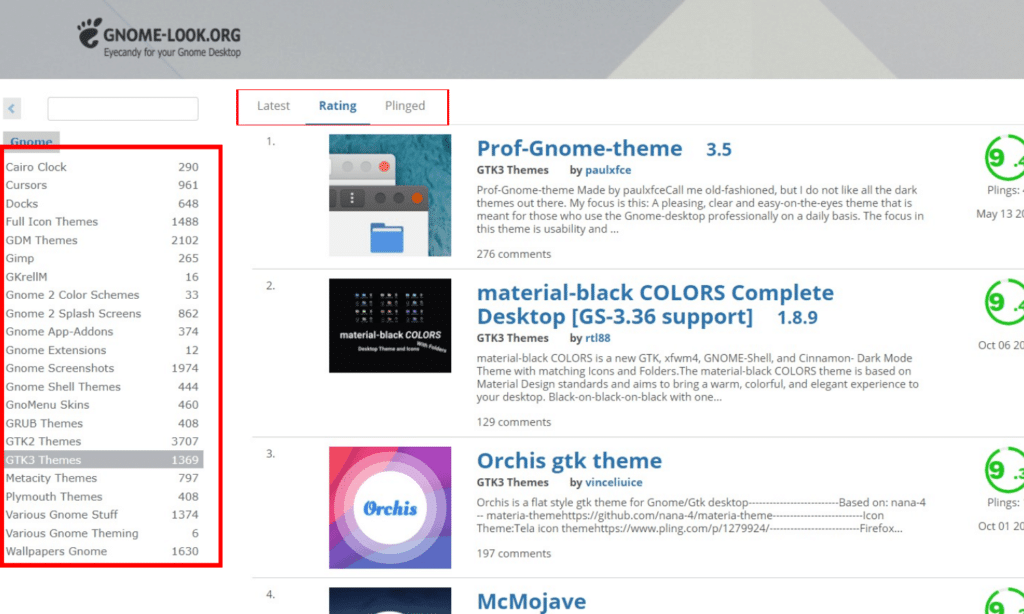
Go to gnome-look.org. On the left sidebar of the website, there are many categories. Choose GTK 3/GNOME Shell Themes (Latest) and now order it by rating to get the most rated themes.

Click on any theme that you like. For this blog I am going with Orchis gtk theme.
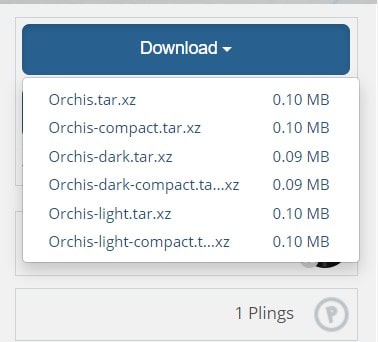
Now Download the theme from the collection. In the Orchis GTK theme, I am going with the orchis-dark-compact.tar.xz.

Step 2: Extract the downloaded file
The Downloaded file is archived so we need to extract it to get the original file.
Step 3: Add to Themes Directory
This is probably the most important step. In this step we will have to store the extracted file to /usr/share/theme location.
But you will not able to do it directly. We will have to use a command that will give us permission to put our downloaded theme at that location.
$ sudo nautilusnautilus – This command is used to open the file manager in Ubuntu. When used with Sudo, the user gets the root level permission and we can make changes.
When the above command is executed, a new dialog will open move to /usr/share/theme location and move the downloaded theme folder.
Close both the dialog and the terminal after the work is done.
Step 4: Change Theme from Tweaks Tool
After completing the above process, open the GNOME Tweak tool and go to the Appearance section. Click on the Application dropdown and you will see the name of the theme that you just moved to /usr/share/theme location.
Choose the option and feel the change. If no changes are made, restart the ubuntu once and you will see it.
Change Icons in Ubuntu
The procedure of changing icons will be the same as of the changing themes.
Some points to take care.
- Download the icons file from the gnome-look.org website.
- Place the extracted file to the /usr/share/icons location(using
sudo nautiluscommand).
Change Shell in Ubuntu
By default, changing the shell in the appearance section is disabled in the GNOME Tweaks tool. In order to enable it, install the user-themes extension from the browser or terminal as shown in the previous blog.
The custom themes downloaded in the previous section also include the custom shell and thus you can choose anyone you want.
Change Dock Panel in Ubuntu
Install Dash-to-Dock Extension in GNOME Tweak Tool and change the setting of the extension to achieve your desired style of dock panel in Ubuntu.
Hope you like it!
Interested in C Language. Have a look!


